Đây là một bài cũng rất lâu rồi, nhưng nay mình sẽ san sớt lại cho Anh chị
Project QLSVApplication: là vận dụng tiêu dùng để hiển thị thông tin sinh viên, chỉ là 1 Datagridview để hiển thị lên.
Project SetupEngine : là Project loại Libraries, project này chúng ta sẽ thêm mẫu Installer đặt tên là InstallerEngine (Class này có nhiệm vụ cài đặt cơ sở dữ liệu vào máy tính, với các tham số được truyền vào từ công đoạn cài đặt do ta quy định). Ta sẽ nhúng các SQL Script mà SQLServer sản xuất cho ta vào đây mang tên sqldata.txt và sqldropcreate.txt (nhớ đặt tên viết thường, ta sẽ đi vào chi tiết ở phần sau)
Ta sẽ biên dịch project này thành dll để tiêu dùng trong Project QLSVSetup.
Project QLSVSetup : dùng để cài đặt áp dụng QLSVApplication vào máy tính, và ra lệnh cho SetupEngine cài đặt cơ sở dữ liệu
Bước 1: Tạo áp dụng tiêu dùng
Project QLSVApplication:
Trong project này thuần tuý chỉ là hiển thị thông báo, chuỗi kết nối sẽ được đọc từ app.config. Chuỗi này sẽ được cấp nhập trong công đoạn cài đặt vào máy tính.


Bước 2: Tạo Project để cài đặt CSDL
Project SetupEngine: Project sử dụng để tạo CSDL, Project này chúng ta nhớ chọn loại Libraries
– Để tạo class Installer như trong project: Bấm chuột phải vào Project/ chọn Add / New Item . Trong của sổ mới hiện lên chúng ta tìm tới loại Installer Class, đặt tên class là InstallerEngine

– Đặt tên class InstallerEngine rồi nhấn Add
– tiếp diễn tạo hai Text File để lưu SQL Script (các Script này được lấy bằng dụng cụ SQL Server cho lẹ). Ở đây ta chia làm hai tập tin SQL Script bởi vì lý do sau: Thao tác tạo CSDL thiết yếu thời kì chờ để nó kịp update vào SQL Server. Ta cho chờ 1 thời kì sau Đó mới tiếp tục chạy những SQL Script về tạo bảng, insert dữ liệu…
– Để tạo Text File: Bấm chuột phải vào Project / Add/ New Item / chọn Text File và nhập tên

– Trên đây là tạo Text File tên sqldropcreate.txt , chú ý nhớ đặt tên viết thường đông đảo.
– Sau khi tạo xong tập tin sqldropcreate.txt, chép đoạn Script tạo CSDL vào đây (xem hình ):

–>Các script này sở hữu sẵn do SQL Server tự tạo nên ta chỉ cần copy từ ngừng thi côngĐây vào đây (nhớ bỏ hết các mẫu sở hữu chữ Go)
– Tiếp theo ta phải cấu hình để hai Text File này được nhúng vào Resource sau lúc biên dịch.
– Trong Properties: tuần tự chọn 2 Text File trên và chọn Embedded Resource trong Build Action

– hiện nay chúng ta tiến hành chỉnh sủa class InstallerEngine:
| using System;using System.Collections;using System.Collections.Generic;using System.ComponentModel;using System.Configuration.Install; using System.Linq; using System.IO; using System.Reflection; using System.Data.SqlClient; using System.Xml; using System.Collections.Specialized; namespace SetupEngine [RunInstaller(true)] public partial class InstallerEngine : System.Configuration.Install.Installer private string logFilePath =""; private string pathApp = ""; public InstallerEngine() InitializeComponent(); private string GetSql(string Name) try // Gets the current assembly. Assembly Asm = Assembly.GetExecutingAssembly(); // Resources are named using a fully qualified name. Stream strm = Asm.GetManifestResourceStream(Asm.GetName().Name + "." + Name); // Reads the contents of the embedded file. StreamReader reader = new StreamReader(strm); string sInfor = reader.ReadToEnd(); Log(sInfor); reader.Close(); return sInfor; catch (Exception ex) Log(ex.ToString()); throw ex; private void ExecuteSql(string serverName, string dbName, string userid, string password, string Sql) string connStr = "server =" + serverName + ";database =" + dbName + ";uid=" + userid + ";pwd=" + password; using (SqlConnection conn = new SqlConnection(connStr)) try SqlCommand cmd = new SqlCommand(Sql); conn.Open(); cmd.Connection = conn; int n = cmd.ExecuteNonQuery(); Log(" n= " + n); conn.Close(); catch (Exception ex) Log(ex.ToString()); protected void AddDBTable(string serverName, string userid, string password) try // Creates the database and installs the tables. string strScript = GetSql("sqldropcreate.txt"); ExecuteSql(serverName, "master", userid, password, strScript); System.Threading.Thread.Sleep(60 * 1000); strScript = GetSql("sqldata.txt"); ExecuteSql(serverName, "dbqlsv", userid, password, strScript); System.Threading.Thread.Sleep(60 * 1000); string connStr = "server =" + serverName + ";database =dbqlsv;uid=" + userid + ";pwd=" + password; Log("AppPath=" + pathApp); XmlDocument xmlDom = new XmlDocument(); xmlDom.Load(pathApp); // Get XML node XmlNode xmlNode = xmlDom.SelectSingleNode( "configuration/appSettings/add[@key='MYCONN']"); xmlNode.Attributes["value"].Value = connStr; // Updating connection string in file Log("Followind node of config file will be updated: " + xmlNode.InnerXml); // Save to disk xmlDom.Save(pathApp); catch (Exception ex) //Reports any errors and abort. Log(ex.ToString()); throw ex; protected override void OnAfterInstall(IDictionary savedState) base.OnAfterInstall(savedState); public override void Install(System.Collections.IDictionary stateSaver) base.Install(stateSaver); string assemPath = this.Context.Parameters["assemblypath"]; int pos = assemPath.LastIndexOf("\"); logFilePath = assemPath .Substring(0,pos+1)+ "\SetupLog117.txt"; pathApp = assemPath.Substring(0, pos + 1) + "\QLSVApplication.exe.config"; Log("—-Setup started—-"); Log("Server=" + this.Context.Parameters["servername"] + " ; User Id=" + this.Context.Parameters["userid"] + " ; pwd=" + this.Context.Parameters["password"]); foreach (DictionaryEntry s in this.Context.Parameters) Log("Parameter : "+s.Key +" ; value ="+s.Value); AddDBTable(this.Context.Parameters["servername"], this.Context.Parameters["userid"], this.Context.Parameters["password"]); public void Log(string str) StreamWriter Tex; try Tex = File.AppendText(this.logFilePath); Tex.WriteLine(DateTime.Now.ToString() + " " + str); Tex.Close(); catch |
giảng giải một số loại lệnh bên trên:
Hàm GetSql(string Name) : sử dụng để đọc 2 Text File Sql Script. Vì hai tập tin này chúng ta nhúng vào Assembly nên cơ chế đọc tập tin sẽ là tương tự (xem code).
Lệnh : this.Context.Parameters["assemblypath"]; lấy đúng các con phố dẫn mà khi cài đặt chương trình người sử dụng chọn.
Key assemblypath là với sẵn, phải viết y chang.
this.Context.Parameters["servername"], this.Context.Parameters["userid"], this.Context.Parameters["password"]
còn servernam, userid, password là do chúng ta quy định, do chúng ta đặt bên Project Setup, 3 biến này phải đặt giống hệt như 3 biến mà bên Project Setup ta đã đặt.
void AddDBTable(string serverName, string userid, string password) sở hữu nhiệm vụ xóa và tạo mới CSDL sau ngừng thi côngĐây tạo các bảng, dữ liệu. sau lúc tạo xong thì tự động cập nhập file App.config cho chương trình (dùng xml).
Bước 3: Tạo Project Setup

Chọn Setup project: đặt tên QLSVSetup rồi bấm OK.

Bấm chuột phải vào QLSVSetup/ chọn File System:

Tại cửa sổ này ta bấm chuột vào thư mục Application Folder, để sở hữu được thông tin như bên phải của hình ta làm như sau:

Bấm chuột phải vào Application Folder / Add/ Project Output…

tiếp tục thêm những tập tin ứng dụng và app.config bên Project QLSVApplication vào đây:

Bấm chuột phải vào Application Folder / Add/ File:

Kết quả:

Để tạo Shortcut cho ứng dụng sau lúc cài đặt thì ta bấm chuột phải vào QLSVApplication.exe

Sau chậm tiến độ cắt vào User's Desktop hay User's programs menu, ta mang thể tạo bất kỳ thư mục nào bên nhánh trái, rồi chép Shortcut vào chậm triển khai, với thể tạo phổ thông shortcut.
Tiếp theo ta cấu hình giao diện cài đặt, bấm chuột vào QLSVSetup, bên trên ta chọn Icon User Interface Editor:

Màn hình User interface sẽ xuất hiện:

Cửa sổ Add Dialog hiển thị lên:


Cấu hình TextBoxes (A) như hình chụp bên dưới:

những tên : CUSTOMTEXTA1, CUSTOMTEXTA2, CUSTOMTEXTA3 là do ta đặt để bên Custom Action sở hữu thể tham chiếu lấy giá trị trong khoảng màn hình cài đặt. ko tiêu dùng Edit4Property nên lớn cho Edit4Visible =false
– Tiếp theo, cấu hình Custom Action: Bấm chuột phải vào QLSVSetup/ chọn View/ chọn Custom Actions

Tại cửa sổ Custom Actions, Bấm chuột phải vào Install / chọn Add Custom Action…

Chọn Primary ouput from SetupEngine (active) rồi bấm OK.

Sau chậm tiến độ click chuột vào Primary output, Quan sát Properties, Ta cấu hình CustomActionData như hình:

/servername=[CUSTOMTEXTA1] /userid=[CUSTOMTEXTA2] /password=[CUSTOMTEXTA3]
Ta viết y chang như trên, chú ý là 3 biến servername, userid, password ta đặt bên này được dùng cho bên SetupEngine :
this.Context.Parameters["servername"], this.Context.Parameters["userid"], this.Context.Parameters["password"]
tức thị ở đây ta đặt tên gì thì bên SetupEngine phải lấy đúng tên ta đặt bên này
CUSTOMTEXTA1 , CUSTOMTEXTA2, CUSTOMTEXTA3 là do ta đặt cho những EditPropertie của Textboxes (A)
Bước 4: biên dịch và cài đặt
– Cấu hình QLSVSetup như bên dưới

Chọn Rebuild để biên dịch Setup.

Sau chậm tiến độ chọn Install để cài đặt:

các bước cài đặt:

- BẤM next, tự động xuất hiện màn hình cấu hình CSDL (chính là Textboxes (A))
 2. Nhập thông báo và bấm Next:
 3. Chọn trục đường dẫn cài đặt và bấm Next … cứ vậy là xong. Chương trình sẽ cài đặt vận dụng song song cài đặt SQL luôn (có cập nhật kết nối cho ta luôn)
Kết quả Nhìn vào màn hình Desktop và phát động chương trình:

chuyên chở tập tin hướng dẫn chi tiết tại đây : http://www.mediafire.com/?16y4jy4pwpq1mpj
tải source code tại đây: http://www.mediafire.com/?35rflfc15bdav5v
Chúc Anh chị thành công
bí quyết tạo setup project visual studio mang Sql server
Tạo Solution mang chứa 3 Project bên như dưới:

Project QLSVApplication: là ứng dụng tiêu dùng để hiển thị thông báo sinh viên, chỉ là 1 Datagridview để hiển thị lên.
Project SetupEngine : là Project chiếc Libraries, project này chúng ta sẽ thêm dòng Installer đặt tên là InstallerEngine (Class này mang nhiệm vụ cài đặt cơ sở dữ liệu vào máy tính, sở hữu các tham số được truyền vào từ thời kỳ cài đặt do ta quy định). Ta sẽ nhúng các SQL Script mà SQLServer sản xuất cho ta vào đây có tên sqldata.txt và sqldropcreate.txt (nhớ đặt tên viết thường, ta sẽ đi vào chi tiết ở phần sau)
Ta sẽ biên dịch project này thành dll để sử dụng trong Project QLSVSetup.
Project QLSVSetup : dùng để cài đặt áp dụng QLSVApplication vào máy tính, và ra lệnh cho SetupEngine cài đặt cơ sở dữ liệu
Bước 1: Tạo vận dụng dùng
Project QLSVApplication:
Trong project này đơn thuần chỉ là hiển thị thông báo, chuỗi kết nối sẽ được đọc trong khoảng app.config. Chuỗi này sẽ được cấp nhập trong thời kỳ cài đặt vào máy tính.


Bước 2: Tạo Project để cài đặt CSDL
Project SetupEngine: Project dùng để tạo CSDL, Project này chúng ta nhớ chọn cái Libraries
– Để tạo class Installer như trong project: Bấm chuột phải vào Project/ chọn Add / New Item . Trong của sổ mới hiện lên chúng ta sắm tới dòng Installer Class, đặt tên class làInstallerEngine
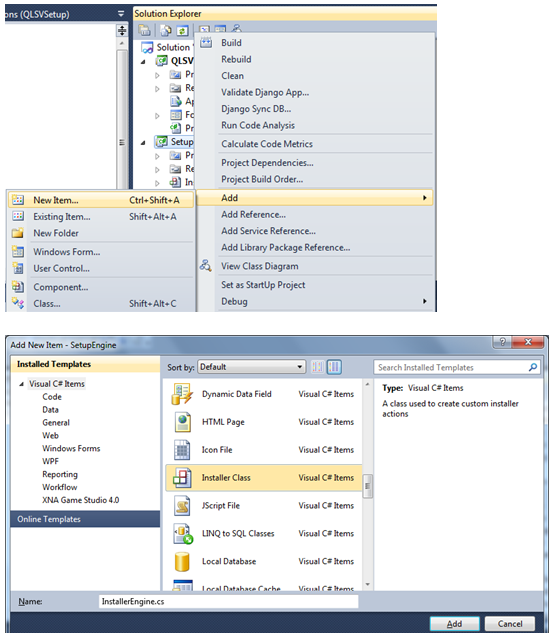
– Đặt tên class InstallerEngine rồi nhấn Add
– tiếp tục tạo 2 Text File để lưu SQL Script (các Script này được lấy bằng phương tiện SQL Server cho lẹ). Ở đây ta chia làm cho 2 tập tin SQL Script bởi vì lý do sau: Thao tác tạo CSDL cần thiết thời gian chờ để nó kịp update vào SQL Server. Ta cho chờ một thời gian sau Đó mới tiếp diễn chạy những SQL Script về tạo bảng, insert dữ liệu…
– Để tạo Text File: Bấm chuột phải vào Project / Add/ New Item / chọn Text File và nhập tên

– Trên đây là tạo Text File tên sqldropcreate.txt , chú ý nhớ đặt tên viết thường hầu hết.
– Sau lúc tạo xong tập tin sqldropcreate.txt, chép đoạn Script tạo CSDL vào đây (xem hình ):

–>Các script này có sẵn do SQL Server tự tạo nên ta chỉ cần copy từ chậm tiến độ vào đây (nhớ bỏ hết những chiếc sở hữu chữ Go)
– Tiếp theo ta phải cấu hình để hai Text File này được nhúng vào Resource sau khi biên dịch.
– Trong Properties: tuần tự chọn hai Text File trên và chọn Embedded Resource trongBuild Action

– hiện giờ chúng ta tiến hành chỉnh sủa class InstallerEngine:
| using System;using System.Collections;using System.Collections.Generic; using System.ComponentModel; using System.Configuration.Install; using System.Linq; using System.IO; using System.Reflection; using System.Data.SqlClient; using System.Xml; using System.Collections.Specialized; namespace SetupEngine [RunInstaller(true)] public partial class InstallerEngine : System.Configuration.Install.Installer private string logFilePath =""; private string pathApp = ""; public InstallerEngine() InitializeComponent(); private string GetSql(string Name) try // Gets the current assembly. Assembly Asm = Assembly.GetExecutingAssembly(); // Resources are named using a fully qualified name. Stream strm = Asm.GetManifestResourceStream(Asm.GetName().Name + "." + Name); // Reads the contents of the embedded file. StreamReader reader = new StreamReader(strm); string sInfor = reader.ReadToEnd(); Log(sInfor); reader.Close(); return sInfor; catch (Exception ex) Log(ex.ToString()); throw ex; private void ExecuteSql(string serverName, string dbName, string userid, string password, string Sql) string connStr = "server =" + serverName + ";database =" + dbName + ";uid=" + userid + ";pwd=" + password; using (SqlConnection conn = new SqlConnection(connStr)) try SqlCommand cmd = new SqlCommand(Sql); conn.Open(); cmd.Connection = conn; int n = cmd.ExecuteNonQuery(); Log(" n= " + n); conn.Close(); catch (Exception ex) Log(ex.ToString()); protected void AddDBTable(string serverName, string userid, string password) try // Creates the database and installs the tables. string strScript = GetSql("sqldropcreate.txt"); ExecuteSql(serverName, "master", userid, password, strScript); System.Threading.Thread.Sleep(60 * 1000); strScript = GetSql("sqldata.txt"); ExecuteSql(serverName, "dbqlsv", userid, password, strScript); System.Threading.Thread.Sleep(60 * 1000); string connStr = "server =" + serverName + ";database =dbqlsv;uid=" + userid + ";pwd=" + password; Log("AppPath=" + pathApp); XmlDocument xmlDom = new XmlDocument(); xmlDom.Load(pathApp); // Get XML node XmlNode xmlNode = xmlDom.SelectSingleNode( "configuration/appSettings/add[@key='MYCONN']"); xmlNode.Attributes["value"].Value = connStr; // Updating connection string in file Log("Followind node of config file will be updated: " + xmlNode.InnerXml); // Save lớn disk xmlDom.Save(pathApp); catch (Exception ex) //Reports any errors and abort. Log(ex.ToString()); throw ex; protected override void OnAfterInstall(IDictionary savedState) base.OnAfterInstall(savedState); public override void Install(System.Collections.IDictionary stateSaver) base.Install(stateSaver); string assemPath = this.Context.Parameters["assemblypath"]; int pos = assemPath.LastIndexOf("\\"); logFilePath = assemPath .Substring(0,pos+1)+ "\\SetupLog117.txt"; pathApp = assemPath.Substring(0, pos + 1) + "\\QLSVApplication.exe.config"; Log("—-Setup started—-"); Log("Server=" + this.Context.Parameters["servername"] + " ; User Id=" + this.Context.Parameters["userid"] + " ; pwd=" + this.Context.Parameters["password"]); foreach (DictionaryEntry s in this.Context.Parameters) Log("Parameter : "+s.Key +" ; value ="+s.Value); AddDBTable(this.Context.Parameters["servername"], this.Context.Parameters["userid"], this.Context.Parameters["password"]); public void Log(string str) StreamWriter Tex; try Tex = File.AppendText(this.logFilePath); Tex.WriteLine(DateTime.Now.ToString() + " " + str); Tex.Close(); catch |
giảng giải một số dòng lệnh bên trên:
Hàm GetSql(string Name) : dùng để đọc 2 Text File Sql Script. Vì 2 tập tin này chúng ta nhúng vào Assembly nên cơ chế đọc tập tin sẽ là như vậy (xem code).
Lệnh : this.Context.Parameters["assemblypath"]; lấy đúng con đường dẫn mà khi cài đặt chương trình người dùng chọn.
Key assemblypath là mang sẵn, phải viết y chang.
this.Context.Parameters["servername"], this.Context.Parameters["userid"], this.Context.Parameters["password"]
còn servernam, userid, password là do chúng ta quy định, do chúng ta đặt bên Project Setup, 3 biến này phải đặt y chang như 3 biến mà bên Project Setup ta đã đặt.
void AddDBTable(string serverName, string userid, string password) mang nhiệm vụ xóa và tạo mới CSDL sau chậm triển khai tạo các bảng, dữ liệu. sau lúc tạo xong thì tự động cập nhập file App.config cho chương trình (dùng xml).
Bước 3: Tạo Project Setup

Chọn Setup project: đặt tên QLSVSetup rồi bấm OK.

Bấm chuột phải vào QLSVSetup/ chọn File System:

Tại cửa sổ này ta bấm chuột vào thư mục Application Folder, để mang được thông báo như bên phải của hình ta khiến cho như sau:

Bấm chuột phải vào Application Folder / Add/ Project Output…

tiếp diễn thêm những tập tin vận dụng và app.config bên Project QLSVApplication vào đây:

Bấm chuột phải vào Application Folder / Add/ File:

Kết quả:

Để tạo Shortcut cho áp dụng sau khi cài đặt thì ta bấm chuột phải vào QLSVApplication.exe

Sau chậm tiến độ cắt vào User's Desktop hay User's programs thực đơn, ta sở hữu thể tạo bất kỳ thư mục nào bên nhánh trái, rồi chép Shortcut vào chậm tiến độ, với thể tạo phổ quát shortcut.
Tiếp theo ta cấu hình giao diện cài đặt, bấm chuột vào QLSVSetup, bên trên ta chọn Icon User Interface Editor:

Màn hình User interface sẽ xuất hiện:

Cửa sổ Add Dialog hiển thị lên:


Cấu hình TextBoxes (A) như hình chụp bên dưới:

các tên : CUSTOMTEXTA1, CUSTOMTEXTA2, CUSTOMTEXTA3 là do ta đặt để bên Custom Action sở hữu thể tham chiếu lấy giá trị từ màn hình cài đặt. ko tiêu dùng Edit4Property nên lớn cho Edit4Visible =false
– Tiếp theo, cấu hình Custom Action: Bấm chuột phải vào QLSVSetup/ chọn View/ chọn Custom Actions

Tại cửa sổ Custom Actions, Bấm chuột phải vào Install / chọn Add Custom Action…

Chọn Primary ouput from SetupEngine (active) rồi bấm OK.

Sau ngừng thi côngĐây click chuột vào Primary output, Nhìn vào Properties, Ta cấu hình CustomActionData như hình:

/servername=[CUSTOMTEXTA1] /userid=[CUSTOMTEXTA2] /password=[CUSTOMTEXTA3]
Ta viết y chang như trên, chú ý là 3 biến servername, userid, password ta đặt bên này được tiêu dùng cho bên SetupEngine :
this.Context.Parameters["servername"], this.Context.Parameters["userid"], this.Context.Parameters["password"]
nghĩa là ở đây ta đặt tên gì thì bên SetupEngine phải lấy đúng tên ta đặt bên này
CUSTOMTEXTA1 , CUSTOMTEXTA2, CUSTOMTEXTA3 là do ta đặt cho những EditPropertie của Textboxes (A)
Bước 4: biên dịch và cài đặt
– Cấu hình QLSVSetup như bên dưới

Chọn Rebuild để biên dịch Setup.

Sau chậm triển khai chọn Install để cài đặt:

các bước cài đặt:

- BẤM next, tự động xuất hiện màn hình cấu hình CSDL (chính là Textboxes (A))
 2. Nhập thông báo và bấm Next:
 3. Chọn trục đường dẫn cài đặt và bấm Next … cứ vậy là xong. Chương trình sẽ cài đặt áp dụng đồng thời cài đặt SQL luôn (có cập nhật kết nối cho ta luôn)
Kết quả Quan sát màn hình Desktop và khởi động chương trình:

chuyên chở tập tin chỉ dẫn chi tiết tại đây : http://www.mediafire.com/view/?n3qjzbvthnt9q3n
tải source code tại đây: http://www.mediafire.com/download.php?vzqfjsaiqk5n8sg
Chúc Cả nhà thành công
Chụp màn hình Desktop – Capture Desktop Screen – C#
Topic này Tôi muốn chỉ dẫn Anh chị cách thức chụp hồ hết màn hình Desktop bằng C# và chụp màn hình theo vị trí con trỏ chuột mà bạn Drag (Capture Area).
– Mỗi lần click vào chụp màn hình Desktop, chương trình sẽ tự động chụp và lưu hình vào thư mục picture cộng tập tin chạy. giả dụ chưa sở hữu thư mục thì nó sẽ tự động tạo. cùng lúc nó tự động cập nhật lên giao diện (phía bên trái màn hình). Ở đây Tôi viết code động để load vào PictureBox, sau chậm tiến độ đưa PictureBox vào FlowPanel.
– đặc thù chương lớp lang động lấy Thumbnail cho từng hình ảnh. tức thị ứng mang mỗi một hình bất kỳ thì nó tự động lấy thumbnail cho mỗi hình là width=100, height=100. lúc click vào từng hình thumbnail trong picturebox thì hình gốc của nó sẽ được hiển thị bên phải màn hình. Chú ý là hình thumbnail được tạo trong bộ nhớ.
– lúc bấm vào chụp màn hình theo chuột thì bạn click chuột vào vị trí bất kỳ trên màn hình rồi giữ chuột + rê đi chỗ khác. khi bạn dừng rê và nhả chuột ra thì nó sẽ chụp mẫu khung hình mà bạn chọn.
Giao diện chính như sau:

Thủ thuật để chụp màn hình theo tọa độ chuột là bạn tạo 1 Form cho hiển thị chế độ maximize. Opacity =30% hoặc 20% gì chậm triển khai. Bạn mở code bên trong để xem sẽ hiểu rõ hơn.
Source Code:
http://www.mediafire.com/?fchjjkwu33yhy1o
Have Fun!
ví dụ về Download Manager

mang rất nhiều tiết mục minh họa download. Ở đây Tôi chọn 1 ví dụ nhỏ và dễ hiểu từ trên internet để phân phối lại cho Anh chị em. Cả nhà mang thể thấy nó bất cứ đâu trên internet. http://www.mediafire.com/?cb9l6imuuh8e0i9
Ở đây Tôi sửa lại chương trình gốc một chút đỉnh, chậm tiến độ là Tôi tạo 1 User Control và đưa sắp xếp lại giống như hình bên trên mà Các bạn Thấy.
Mỗi lần bấm Add URL lớn download thì user control sẽ được add vào FlowPanel như trên. Bạn xem mấy Properties Tôi thêm vào:
public Panel MyPanel get; set;
public string MyFileFromServer get; set;
public string MyFileToClient get; set;
Mục đích Tôi tách ra tương tự để minh họa multi download.
sở hữu rất nhiều nội dung rất hay cơ mà coding phức tạp nên Tôi chưa cung ứng, Anh chị em cũng sở hữu thể tìm thấy nó trên internet.
Have fun!
tỉ dụ chương trình download tập tin bằng C#
Trong Topic này Tôi muốn hướng dẫn Anh chị em bí quyết viết chương trình download tập tin từ internet
Ở đây Tôi tạo 3 Project (ứng sở hữu 3 kiểu viết, Tôi tạm thời gọi vậy)
Ta sẽ hài hòa Progressbar để hiển thị giai đoạn download tập tin:
A) tiêu dùng Window Form
B) tiêu dùng WPF
=========================================================
giả dụ như thường biết cách thức cập nhập progressbar thì chương trình của bạn mang thể bị treo, nó sẽ không cho phép bạn tương tác đến những control khác cho tới khi download xong.
Chúng ta phải viết code để khắc phục vấn đề này. tức là chương trình load thì cứ load, ta tương tác sở hữu những control khác thì cứ tương tác:
Tôi có giảng giải trong coding nên trong topic Tôi không giải thích thêm nữa
A) dùng Window Form:
Form 1: sử dụng component BackgroundWorker

Ta sẽ tiêu dùng component BackgroundWorker, trường hợp này khá "lằng nhằng" tí đỉnh, ví như bạn cảm thấy "khó chịu" thì hãy qua Form2 để xem Tôi ko sử dụng component BackgroundWorker.
Sau khi bề ngoài xong giao diện như trên, bạn kéo thả component BackgroundWorker vào winform như hình bên dưới:

Cấu hình BackgroundWorker như trên, sau chậm triển khai bạn mở qua tab Event của BackgroundWorker:

Để mang được các sự kiện như trên thì bạn chỉ cần double click vào tên từng sự kiện là tự động nó phát sinh ra cho bạn.
hiện tại bạn xem coding behind:
| using System; using System.Collections.Generic; using System.ComponentModel; using System.Data; using System.Drawing; using System.Linq; using System.Text; using System.Windows.Forms; using System.IO; using System.Net; namespace ExampleBackgroundWorker public partial class frmExample1 : Form public frmExample1() InitializeComponent(); private void btnTestDownload_Click(object sender, EventArgs e) backgroundWorker1.RunWorkerAsync(); private void backgroundWorker1_DoWork(object sender, DoWorkEventArgs e) //Lấy trục đường dẫn muốn download string sUrl =txtURL.Text.Trim(); //Đường dẫn lưu xuống ổ cứng string sSave= txtSave.Text.Trim(); // Xác định dung lượng tập tin Uri url = new Uri(sUrl); System.Net.HttpWebRequest request = (System.Net.HttpWebRequest)System.Net.WebRequest.Create(url); System.Net.HttpWebResponse response = (System.Net.HttpWebResponse)request.GetResponse(); response.Close(); // Lấy dung lượng tập tin Int64 iSize = response.ContentLength; // Khởi tạo dung lượng download được từ URL Int64 iRunningByteTotal = 0; // dùng Webclient để download WebClient client = new WebClient(); // Mở URL để download Stream streamRemote = client.OpenRead(new Uri(sUrl)); // Vừa đọc vừa lưu Stream streamLocal = new FileStream(sSave, FileMode.Create, FileAccess.Write,FileShare.None); // Tiến hành loop công đoạn download, vừa load vừa lưu int iByteSize = 0; byte[] byteBuffer = new byte[iSize]; while ((iByteSize = streamRemote.Read(byteBuffer, 0, byteBuffer.Length)) > 0) // Lưu byte xuống đường dẫn chỉ định streamLocal.Write(byteBuffer, 0, iByteSize); iRunningByteTotal += iByteSize;//cập nhập số byte đã load được // Chuyển đổi ra tỉ lệ 100% double dIndex = (double)(iRunningByteTotal); double dTotal = (double)byteBuffer.Length; double dProgressPercentage = (dIndex / dTotal); int iProgressPercentage = (int)(dProgressPercentage * 100); // Cập nhập progressbar backgroundWorker1.ReportProgress(iProgressPercentage); streamLocal.Close(); streamRemote.Close(); private void backgroundWorker1_ProgressChanged(object sender, ProgressChangedEventArgs e) progressBar1.Value = e.ProgressPercentage; lblPercentage.Text = e.ProgressPercentage + "%"; private void backgroundWorker1_RunWorkerCompleted(object sender, RunWorkerCompletedEventArgs e) MessageBox.Show("Đã download xong!"); |
Form 2: ko sử dụng component BackgroundWorker
kiểu dáng giao diện như vậy như Form 1, nhưng ko kéo thả component BackgroundWorker

Các bạn xem coding bên dưới:
| using System;using System.Collections.Generic; using System.ComponentModel; using System.Data; using System.Drawing; using System.Linq; using System.Text; using System.Windows.Forms; using System.IO; using System.Net; namespace ExampleBackgroundWorker public partial class frmExample2 : Form public frmExample2() InitializeComponent(); private void btnDownload_Click(object sender, EventArgs e) WebClient wc = new WebClient(); wc.DownloadProgressChanged += new DownloadProgressChangedEventHandler(wc_DownloadProgressChanged); wc.DownloadFileAsync(new Uri(txtURL.Text.Trim()), txtSave.Text); wc.DownloadFileCompleted+=new AsyncCompletedEventHandler(wc_DownloadFileCompleted); public void wc_DownloadProgressChanged(Object sender, DownloadProgressChangedEventArgs e) progressBar1.Value = e.ProgressPercentage; lblPercentage.Text = e.ProgressPercentage + "%"; public void wc_DownloadFileCompleted(Object sender, AsyncCompletedEventArgs e) MessageBox.Show("Download is completed"); |
Trường hợp này với vẻ thuần tuý hơn 1 xíu:
B) sử dụng WPF:
mẫu mã giao diện như vậy, Anh chị tùy thích kiểu dáng, nhưng nhớ đặt tên control cho đúng mang tên mà trong code Tôi lấy ra dùng

Bạn xem code, Tôi vẫn sử dụng WebClient.
| using System; using System.Collections.Generic; using System.Linq; using System.Text; using System.Windows; using System.Windows.Controls; using System.Windows.Data; using System.Windows.Documents; using System.Windows.Input; using System.Windows.Media; using System.Windows.Media.Imaging; using System.Windows.Navigation; using System.Windows.Shapes; using System.IO; using System.Net; namespace BackgroundWorker_WPF /// <summary> /// Interaction logic for MainWindow.xaml /// </summary> public partial class MainWindow : Window public MainWindow() InitializeComponent(); private void btnDownload_Click(object sender, RoutedEventArgs e) WebClient wc = new WebClient(); wc.DownloadProgressChanged += new DownloadProgressChangedEventHandler(wc_DownloadProgressChanged); wc.DownloadFileAsync(new Uri(txtURL.Text.Trim()), txtSave.Text); wc.DownloadFileCompleted +=new System.ComponentModel.AsyncCompletedEventHandler(wc_DownloadFileCompleted); public void wc_DownloadProgressChanged(Object sender, DownloadProgressChangedEventArgs e) progressBar1.Value = e.ProgressPercentage; lblPercentage.Content = e.ProgressPercentage + "%"; public void wc_DownloadFileCompleted(Object sender, System.ComponentModel.AsyncCompletedEventArgs e) MessageBox.Show("Download is completed"); |
Link code đầy đủ:http://www.mediafire.com/?202z1o7v8r3badi
Chúc Cả nhà thành công.
Không có nhận xét nào:
Đăng nhận xét